April 6, 2020 by Trieste LaPorte
So you’ve been happily building managed package applications on the platform and nothing is broken… but now Second Generation Packaging comes along and upgrading is not as simple as it was? You’ve come to the right place.
Purpose
I’ve been leveraging Second Generation Packaging (“2GP” for the remainder of this article) while developing a new application, and I’ve been learning a lot about how it works. It’s pretty cool stuff that plays really nicely with VCS and CI, but I wanted to write an article about one piece that surprised me (emphasis on me). I’m not setting out to build an exhaustive comparison here. The format I chose is just to run you through the steps rather than require you to imagine how it all works. If you’re not a developer, don’t worry. This is good stuff to understand for the whole team and doesn’t require that you have any coding ability. I believe that after running through these steps you’ll be able to avoid some of the issues I created for myself while learning.
How is 2GP different from 1GP?
There are a lot of differences between 1st and 2nd generation packages, but for the purposes of this post, I’d like to focus on these:
- 1GP: We would use SFDX CLI (or some other tool, perhaps CI and the Ant migration toolkit) to write code to the Namespace org. From this org we manage our package using the classic means - the WebUI, metadata API, or even SFDX. We can then publish a beta or a released version of that package, and we’d end up with a 1GP package. Cool.
- 2GP: We use the SFDX CLI to create a package. When we do this (using the
force:package:version:createcommand) the system is creating a Scratch Org (SO) in the background, pushing code, running tests, and creating a beta 2GP. Every time we use theversion:createcommand, we’re creating a new beta package. It’s not until we promote a beta package that we have a released package.
2GP lets us do things like create and simultaneously develop multiple packages in the same namespace, or sever ancestry to previous released versions of the package, allowing us to kind of … reboot things inside of the package. I’m sure you’ve all been there - you typoed a field name, or made a global Boolean that should have been a public String and now you’re stuck with it. 2GP lets you kind of redo that stuff… You can’t push an upgrade that removes a previously released global, but you could create and release a new version without any ancestry and give that new version without the global to new customers. You could then help old customers migrate, but that’s a whole other barrel of monkeys.
What is ancestry?
I touched on this briefly in the previous segment. Ancestry is a parameter you set in your sfdx-project.json file that says “this version I’m currently working on is going to be related to this older released version”. The way Salesforce describes how this works at the time I am writing this article gave me some ideas about how it worked that turned out not to be true when I got to working with it (Read: I made some bad assumptions). I’ll cover how it works in the next segment. But for now, ancestry is what says whether this (new) version can upgrade that (old) version.
The following sentence is what I misunderstood, and didn’t read it as “You MUST specify the immediately previously released version”:
Specify the package ancestor in the sfdx-project.json file using either the ancestorVersion or ancestorId attribute. Use the ancestor that’s the immediate parent of the version you’re creating.
How does it all work?
Here are the understandings I built after reading the Salesforce article.
If I make version .1 and release it, then when I start working on version .2 I should specify version .1 as my ancestor so that I can upgrade to .2 from .1.
This is true. No confusion here.
I’ve released version .1 and .2, and the upcoming .3 is totally compatible with both previous versions. So I should specify .1 as my ancestor in version .3. This is what I understand as ‘common ancestor’ (which is mentioned in error messages)
Sadly, this is not true. Salesforce uses the term ‘Common Ancestor’ in error messages (which I blame for my poor understanding), which you’ll see later when I show some results from our scenarios, and that carried a lot of connotation for me. While developing version .3, one should actually specify version .2 as the ancestor. Salesforce will compute the common ancestor during the releasing and upgrading. So, if version .3 is released, it can still upgrade version .1 and version .2, as long as version .2 was specified as the ancestor. Phew - I hated writing that. This is what Salesforce meant by (again):
Use the ancestor that’s the immediate parent of the version you’re creating.
Deleting Components in 2GP
This section is going to be a bit redundant, but in case someone jumps to this section, I wanted to cover it separately. In short, there’s no way (today, yet, etc.) to remove released components from packages in 2GP, without severing the ancestry. Many of you will recall that in 1GP you could request special permission from Salesforce that enabled the removal of released components - as long as it had no dependencies. You could then push upgrades to force ‘demanagement’ of fields, or removal of triggers, classes, etc. from customer orgs.
With 2GP you can’t request the same special permission (I suspect this will be a thing someday), but you can release a new version without an ancestor. While doing so you can remove anything you like - even globally accessible methods/classes/variables.
Just know that you’ll have to help customers by backing up data, removing dependencies, and uninstalling the old version before installing the new version. Don’t forget to restore the data either.
Setup Steps
As mentioned earlier I wanted to lead you through a series of exercises to illustrate how this works. Here we’re just setting up our development environment.
All of these steps are listed along with their SFDX CLI commands when the commands are used for the first time. I’m going to assume the reader here is familiar with SFDX. If not, it wouldn’t hurt pause here and familiarize yourself with it.
Create Dev Hub
This will need to be done through your web browser.
- Sign up Developer Org
- Enable Dev Hub
- Enable My Domain
Create/Link Namespace
This will also need to be done through your web browser. This article is well written and there’s no reason for me to reproduce everything. Pay special attention to the fact that you are enabling Dev Hub and creating a Namespace in two different orgs.
https://developer.salesforce.com/docs/atlas.en-us.sfdx_dev.meta/sfdx_dev/sfdx_dev_reg_namespace.htm
Create SFDX Project and Auth DevHub
First step here would be to create a new directory on you dev machine. Most of what I include below can be done from within an IDE’s UI, but for simplicity’s sake I’m going to stick to the CLI here. Anywhere I’ve surrounded text in <> is for you to replace. You won’t want to include the <>.
sfdx force:project:create -n <yourprojectname> --template standardsfdx force:auth:web:login --setdefaultdevhubusername --setalias <youralias>Create Scratch Org
We’re just going to work in a single scratch org for the rest of this exercise, so I’ve set it as default. Set the duration days to however many you believe you need, max is 30.
sfdx force:org:create --durationdays 2 --setdefaultusername --setalias <youralias> orgname=<yourorgname> edition=DeveloperPush code to Scratch Org
Grab code from https://github.com/Foglight-Solutions/curiousancestry, drop it in your /force-app/main/default/classes directory.
Run the command:
sfdx force:source:pushCreate the Package
All of our upgrade flows assume that we have a package defined. The following command only needs to be performed once for each package. Once created we can create and release versions. Customers install versions, even though we say that they install packages most of the time.
sfdx force:package:create --name <yourpackagename> --packagetype Managed --path force-app/One more DevEd/Sandbox/Scratch Org, for installs.
You might already have a dev ed org that you can use to install the package we’re playing with here. If you don’t, you’ll want to make one. Don’t do this in prod… Just in case. You’ve been warned.
Illustrative Exercises
The following examples will hopefully illustrate the weirdities and workflows regarding 2GP and upgrades. One very important thing to note is that every DevHub has a limit of 6 scratch orgs or version creates per day. So far I’ve had you create a single scratch org, so you should have 5 left. If you end up hitting the limit, pause and work on this another day. The following have been designed so that you’ll have just enough to finish within the limit.
Create Released Package Version and Install 0.1
Here is the sfdx-project.json I’m using for 0.1, make sure your namespace is what you picked earlier in the namespace org:
{
    "packageDirectories": [
        {
            "path": "force-app",
            "default": true,
            "package": "curiousancestry",
            "versionNumber": "0.1.0.NEXT"
        }
    ],
    "namespace": "curiousancestry",
    "sfdcLoginUrl": "https://login.salesforce.com",
    "sourceApiVersion": "48.0",
    "packageAliases": {
        "curiousancestry": "package_version_id"
    }
}
Your id values will be real, I’ve removed mine.
Here’s the command I’m running to create the package version:
sfdx force:package:version:create --path force-app/ --codecoverage --installationkeybypass --wait 10When this command is done, you’ll see something like:
Successfully created the package version [removed]. Subscriber Package Version Id: version_01_id
Before installing this, we want to release it. Remember, they always get created as Beta versions, and we’re not interested in betas today. Run:
sfdx force:package:version:promote -p version_01_id -nYou can copy this version_01_id value to build a URL that can be used to install the package in your third Dev Org, using this format:
/packagingSetupUI/ipLanding.app?apvId=version_01_idGo ahead and perform the installation now. You will go through the standard installation screens, admin only is fine.
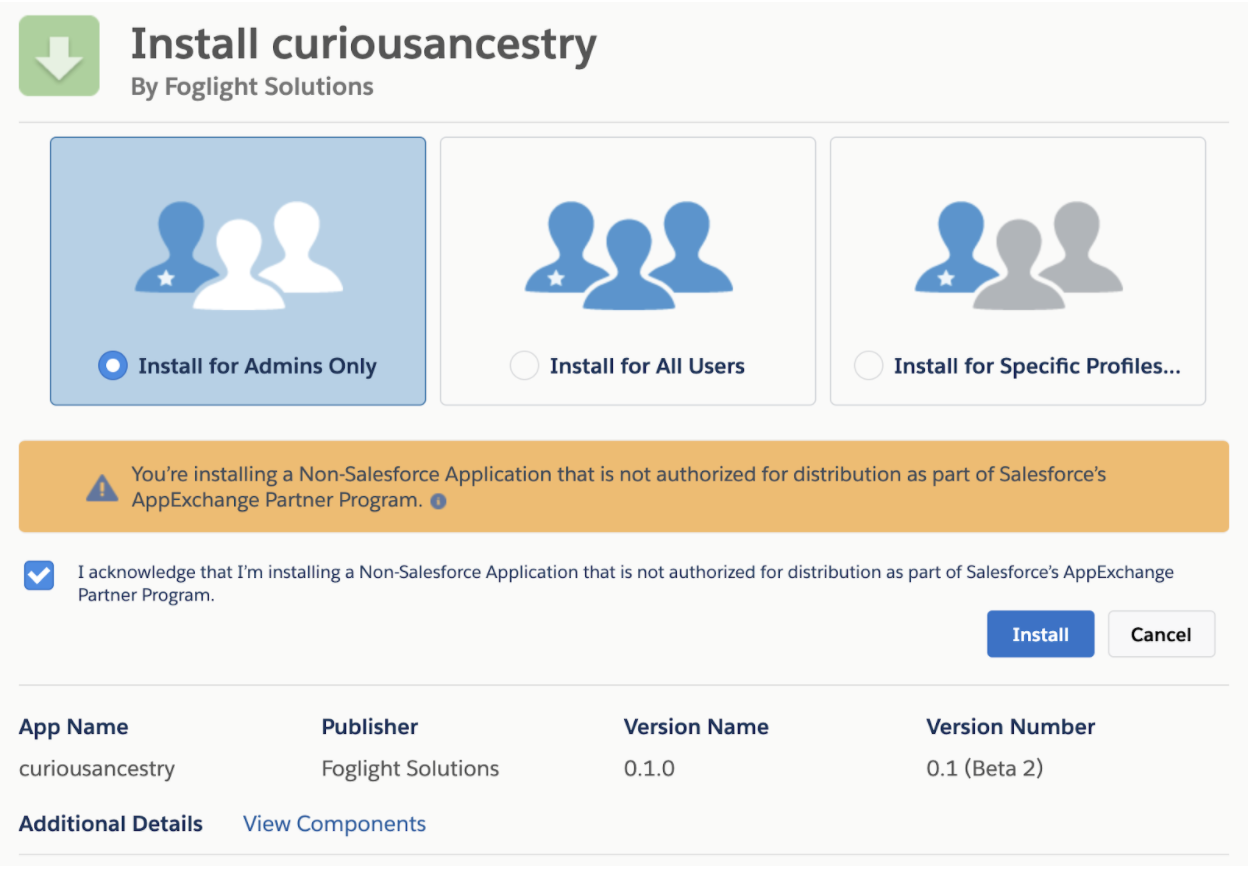
Ignore that the previous screenshot says beta, I didn’t wait long enough after promoting it to install it. You probably want to wait for the beta version text to go away (by refreshing the page) before clicking install. You should end up with the new package appearing on the Installed Packages screen.

That is the simplest possible route to a second generation managed package install. Now we’ll play with upgrades.
Upgrade to 0.2 with ancestry
Update your sfdx-project.json to version .2 and add ancestor version to .1. It should look like this, notice where I replaced Ids, and where the replacement values are the same:
{
    "packageDirectories": [
        {
            "path": "force-app",
            "default": true,
            "package": "curiousancestry",
            "versionNumber": "0.2.0.NEXT",
            "ancestorId": "version_01_id"
        }
    ],
    "namespace": "curiousancestry",
    "sfdcLoginUrl": "https://login.salesforce.com",
    "sourceApiVersion": "48.0",
    "packageAliases": {
        "curiousancestry": "package_version_id",
        "curiousancestry@0.1.0-2": "version_01_id"
    }
}
(Note: SFDX CLI also supports the ancestorVersion parameter, which theoretically should accept values like “0.1.0.0” - but there appears to be a bug at this time with those values not being recognized as released package versions, so I’ve used the Ids of the ancestor version instead.)
Run through the same commands you did during the installation for .1, short version here:
- Create Package Version
- Promote Package Version
- Install Package in Third Dev Org
You should see that the upgrade succeeded:

Upgrade to 0.3 without ancestry
Here we’re going to break things. We’re going to release version .3, but keep the ancestor specified to the .1 ancestor Id. This is what the sfdx-package.json should look like:
{
    "packageDirectories": [
        {
            "path": "force-app",
            "default": true,
            "package": "curiousancestry",
            "versionNumber": "0.3.0.NEXT",
            "ancestorId": "version_01_id"
        }
    ],
    "namespace": "curiousancestry",
    "sfdcLoginUrl": "https://login.salesforce.com",
    "sourceApiVersion": "48.0",
    "packageAliases": {
        "curiousancestry": "package_version_id",
        "curiousancestry@0.1.0-2": "version_01_id",
        "curiousancestry@0.2.0-1": "version_02_id"
    }
}
Run through the same commands you did during the installation for .1 and .2, short version here:
- Create Package Version
- Promote Package Version
- Install Package in Third Dev Org
- You should see something like this:
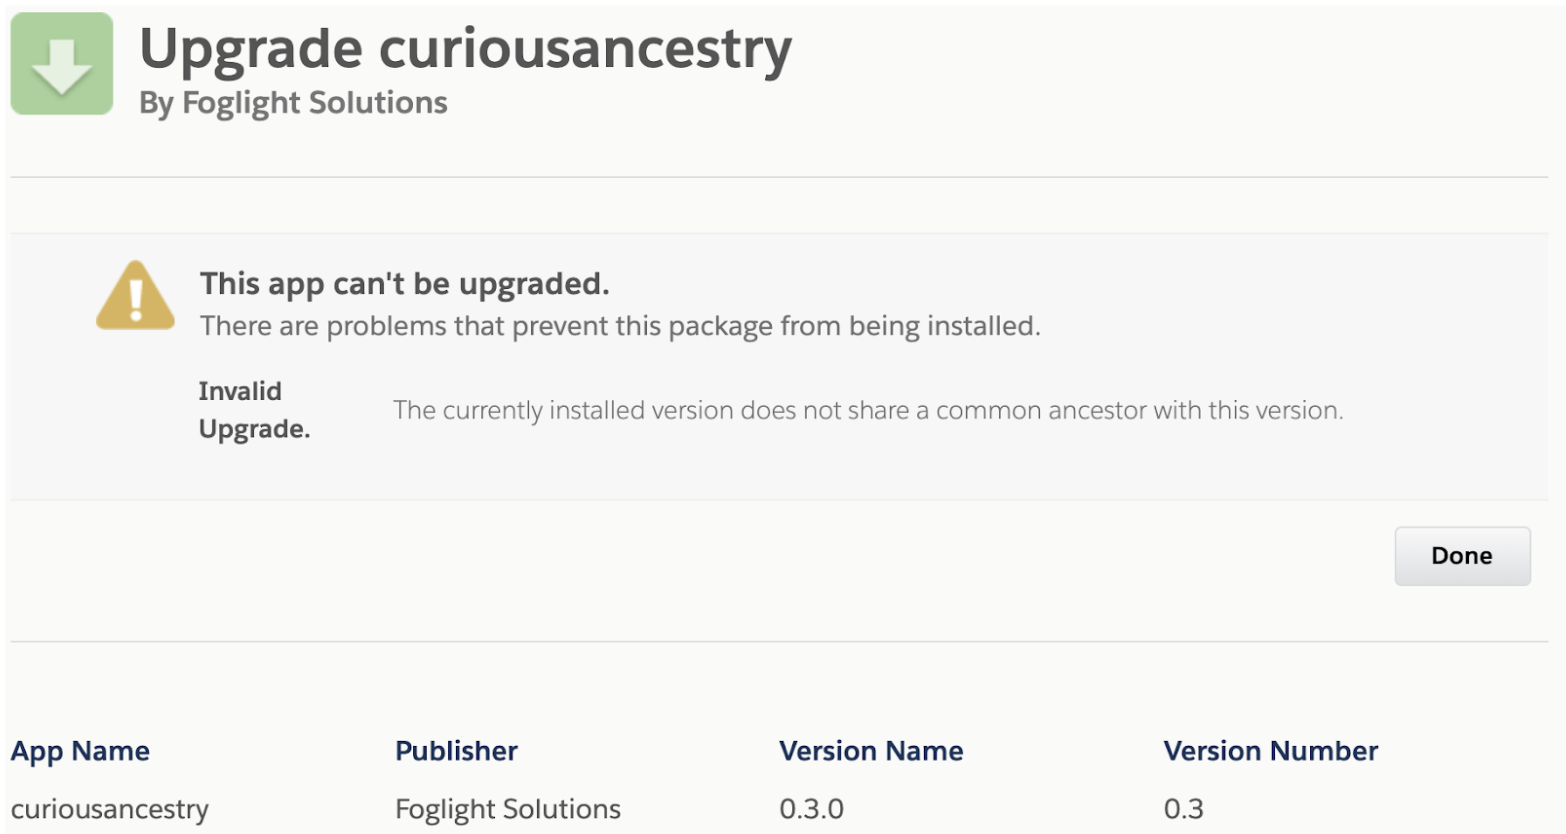
Tthis error message is what originally threw me off. The upgrades can skip versions, but the ancestry for each version cannot. Each new version must specify the immediate previously released version. We just burned version .3. Luckily we can release version .4 with the proper ancestry specified, and upgrade properly.
Upgrade .2 to .4 with proper ancestry
Same idea here… Here’s the sfdx-package.json:
{
    "packageDirectories": [
        {
            "path": "force-app",
            "default": true,
            "package": "curiousancestry",
            "versionNumber": "0.4.0.NEXT",
            "ancestorId": "version_02_id"
        }
    ],
    "namespace": "curiousancestry",
    "sfdcLoginUrl": "https://login.salesforce.com",
    "sourceApiVersion": "48.0",
    "packageAliases": {
        "curiousancestry": "package_version_id",
        "curiousancestry@0.1.0-2": "version_01_id",
        "curiousancestry@0.2.0-1": "version_02_id",
        "curiousancestry@0.3.0-1": "version_03_id"
    }
}
Same steps:
- Create Package Version
- Promote Package Version
- Install Package in Third Dev Org
- Note the upgrade path from .2 to .4!
- This time we’re successful:

Update code to change variable from global to private, sever ancestry
We’re going to break things again here. Follow these steps:
First things first, edit the CuriousIndeed class, and get rid of the global scope on everything.
Old:
global with sharing class CuriousIndeed {
	global static Integer minimumMad = 1;

	public static Integer getMadOrMadder (Integer isMad) {

		// They didn't specify, let's set the default.
		if (isMad == null) {
			isMad = 0;
		}

		// The goal here is to make them more mad on the way out.
		isMad++;

		// return our defined minimum
		return (minimumMad > isMad) ? minimumMad : isMad;
	}
}
New:
public with sharing class CuriousIndeed {
	public static Integer minimumMad = 1;

	public static Integer getMadOrMadder (Integer isMad) {

		// They're didn't specify, let's set the default.
		if (isMad == null) {
			isMad = 0;
		}

		// The goal here is to make them more mad on the way out.
		isMad++;

		// return our defined minimum
		return (minimumMad > isMad) ? minimumMad : isMad;
	}
}
Push this to the SO using sfdx:force:source:push. It should save fine. Remember, this will break packaging in 1GP situations (under normal circumstances).
Update the sfdx-package.json:
{
    "packageDirectories": [
        {
            "path": "force-app",
            "default": true,
            "package": "curiousancestry",
            "versionNumber": "0.5.0.NEXT",
            "ancestorId": "version_04_id"
        }
    ],
    "namespace": "curiousancestry",
    "sfdcLoginUrl": "https://login.salesforce.com",
    "sourceApiVersion": "48.0",
    "packageAliases": {
        "curiousancestry": "package_version_id",
        "curiousancestry@0.1.0-2": "version_01_id",
        "curiousancestry@0.2.0-1": "version_02_id",
        "curiousancestry@0.3.0-1": "version_03_id",
        "curiousancestry@0.4.0-1": "version_04_id"
    }
}
Create a new package version, and try to promote it using the same commands you’ve been using so far. You should see this:

Now update the sfdx-package.json by removing the ancestor stuff, but don’t remove anything else.
{
    "packageDirectories": [
        {
            "path": "force-app",
            "default": true,
            "package": "curiousancestry",
            "versionNumber": "0.5.0.NEXT"
        }
    ],
    "namespace": "curiousancestry",
    "sfdcLoginUrl": "https://login.salesforce.com",
    "sourceApiVersion": "48.0",
    "packageAliases": {
        "curiousancestry": "package_version_id",
        "curiousancestry@0.1.0-2": "version_01_id",
        "curiousancestry@0.2.0-1": "version_02_id",
        "curiousancestry@0.3.0-1": "version_03_id",
        "curiousancestry@0.4.0-1": "version_04_id"
    }
}
Run the package create command again, but this time it should work, and you’ll see this.
Successfully created the package version [removed]. Subscriber Package Version Id: version_05_id
Release this version and attempt to install it in the same org with .4 installed. You will see the following error.
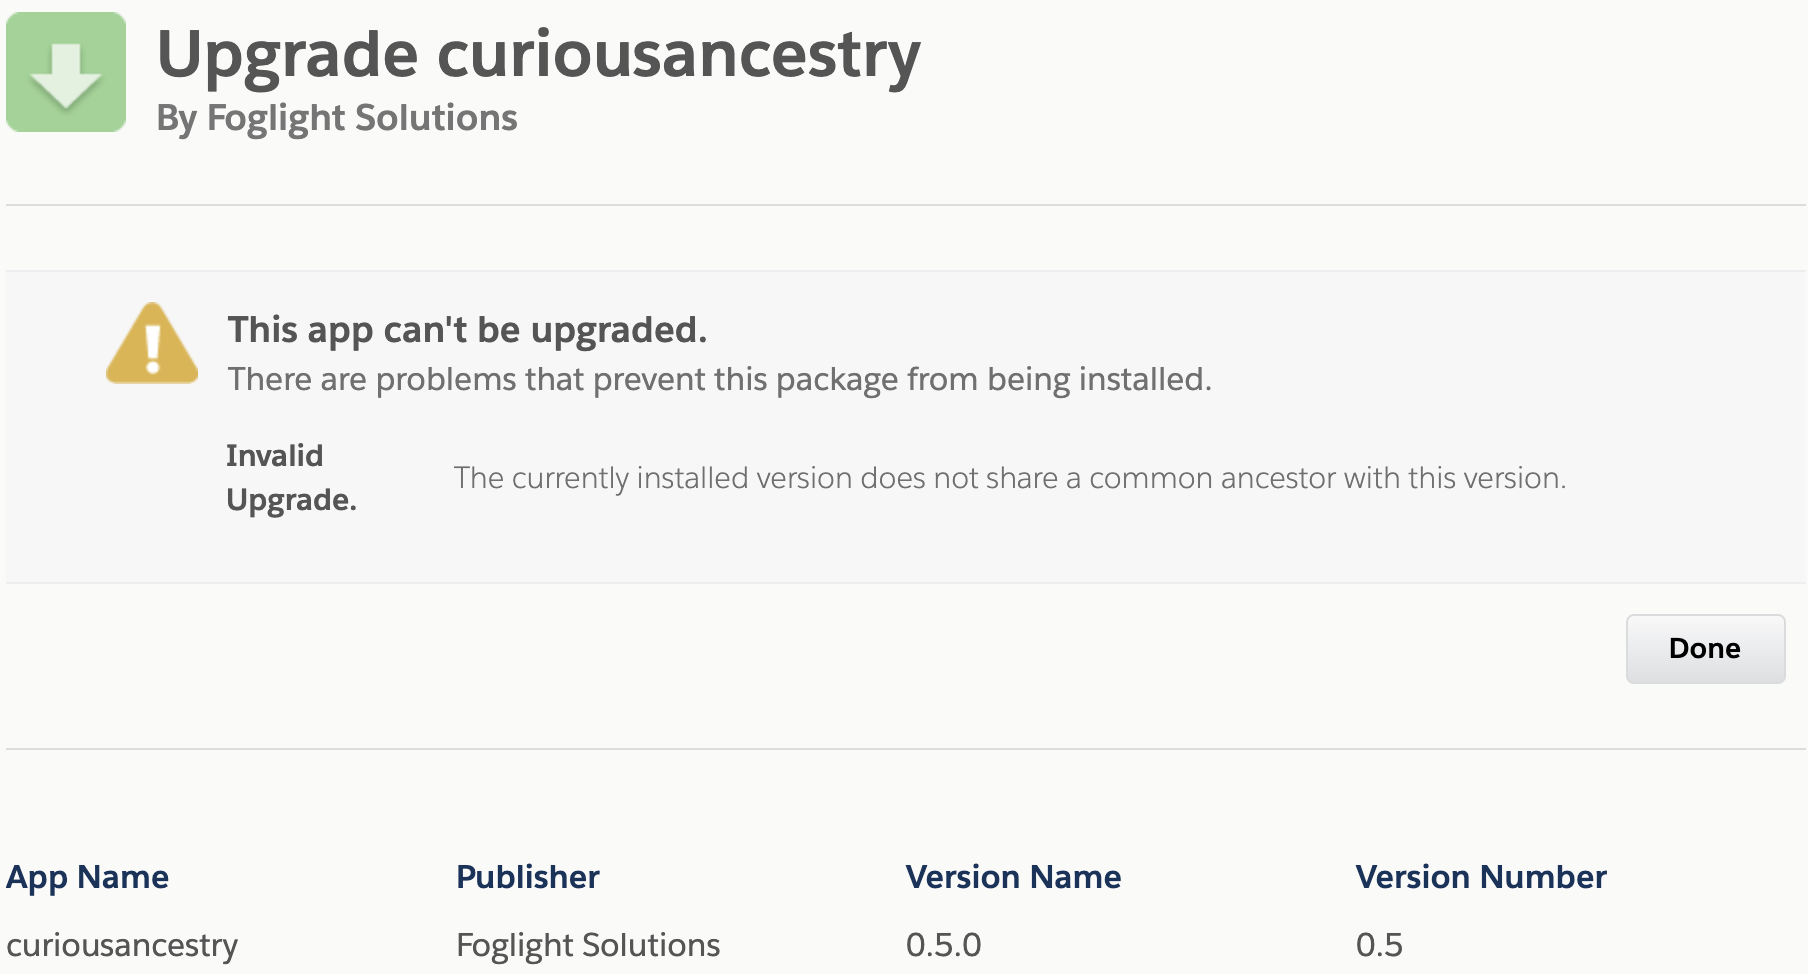
I’m not going to talk about options here since they’ve all been covered throughout this article so far. Short version: You need to uninstall to upgrade to version 5 at the very least, and brand new customers starting at version .5 will be fine.
There’s a lot of workflow I didn’t cover here, such as how patches work with ancestors. That will likely be a post in the future. I hope these illustrations help you to embrace 2GP, and to avoid some easy-to-make mistakes. I’d love feedback, especially regarding any struggles others are having with 2GP, or to point out any of the mistakes I’m surely making. Thanks for reading!

ABOUT THE AUTHOR
Trieste LaPorte | Technical Architect
Trieste is a Technical Architect with Foglight Solutions and has been breaking the platform for a decade.